I’ve learned that the easier you make it for users to log in to your website, the more likely they are to become active members and engage with your content.
That’s where OAuth login comes in – it lets people sign in to your WordPress website with just one click using their existing social accounts like Google, Facebook, or X.
But here’s the thing: while OAuth login sounds simple in theory, setting it up correctly can be tricky. I’ve tested various plugins and methods on real WordPress websites to find the most reliable solution.
Today, I’m sharing my proven method for adding OAuth login to WordPress. I’ll show you how to set it up correctly, avoid common pitfalls, and get it working smoothly on your site.
The Benefits of Adding OAuth Login to WordPress
With traditional logins, weak passwords and forgotten credentials are common problems.
Users often struggle to remember their login details, leading to frustration and frequent password resets. This can create security risks and make the login process feel like a hassle.
OAuth helps prevent these issues by using secure authentication methods from major providers. Instead of creating new usernames and passwords, visitors can log in with accounts they already trust, like Google, Facebook, or GitHub.
Many of these providers also offer two-factor authentication, adding an extra layer of security.
This streamlined login process leads to faster access and fewer abandoned registrations. Users are more likely to complete the process when signing up is as easy as clicking a button.
OAuth also adds an extra layer of security that can reduce spam registrations and fake accounts. Since users log in through verified third-party accounts, it becomes harder for bots and spammers to create fake profiles.
Overall, adding OAuth login to your website creates a smoother, more secure experience for your users. Now, I will show you how to set it up in WordPress.
How to Add OAuth Login in WordPress
Setting up OAuth login in WordPress is easier than you might think. With the right plugin, you can allow users to sign in with their existing social accounts in just a few clicks.
I recommend using Nextend Social Login. It is a popular social media plugin that supports login through third-party providers like Google, Facebook, and Twitter.
Once set up, users will see social login buttons on your login and registration pages, making it simple for them to access your site without creating a new account.
Step 1: Install and Activate the Nextend Social Login Plugin
First, you need to install and activate the Nextend Social Login plugin. For details, see this tutorial on how to install a WordPress plugin.
Note🚨: Nextend Social Login also has a free version that you can use for this tutorial.
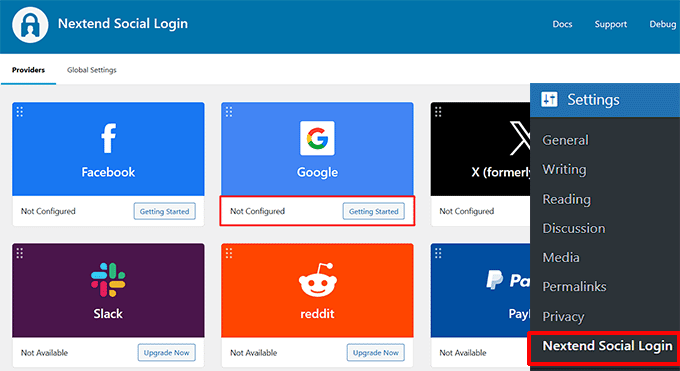
Upon plugin activation, head over to the Settings » Nextend Social Login page from the WordPress dashboard.
For this tutorial, I will show you how to add OAuth login with Google. Nextend Social Login also offers login via Facebook, X (formerly Twitter), Reddit, and more. The process may be slightly different depending on the provider you choose.
Step 2: Create a Google App
Here, you need to click the ‘Getting Started’ button in the Google section.

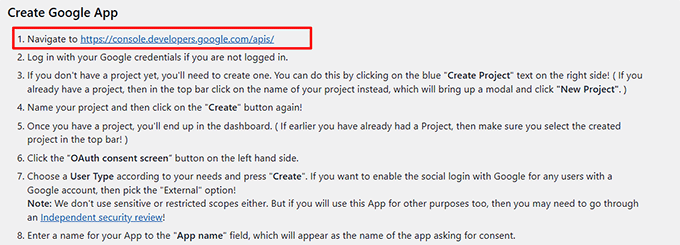
This will take you to a new page, where you will see onscreen instructions to create your Google app that will allow OAuth login with your Google account.
Once you read this content, simply click on the provided Google Search Console link.

This will take you to a new screen, where you can add your Google account credentials to log in.
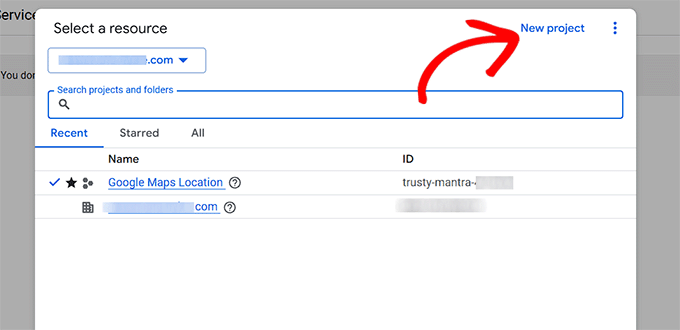
Then, click on the button at the top to open a popup and click the ‘New project’ button.

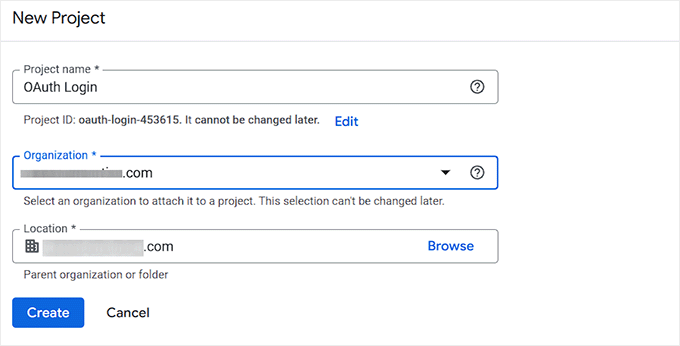
Next, you need to add a name for the project that you are creating.
You can also add a location and organization. After that, click the ‘Create’ button.

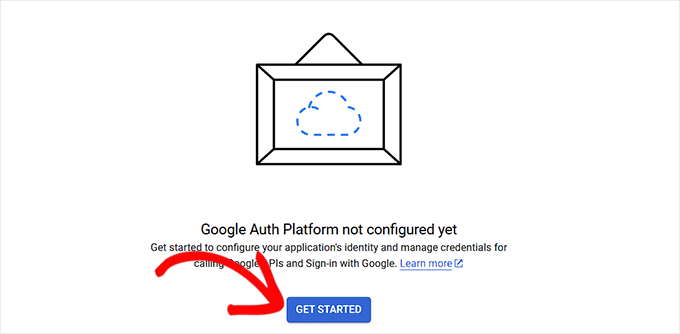
Once you add a project, you will end up back in the dashboard. From here, switch to the ‘OAuth consent screen’ tab from the left column.
Go ahead and click the ‘Get Started’ button.

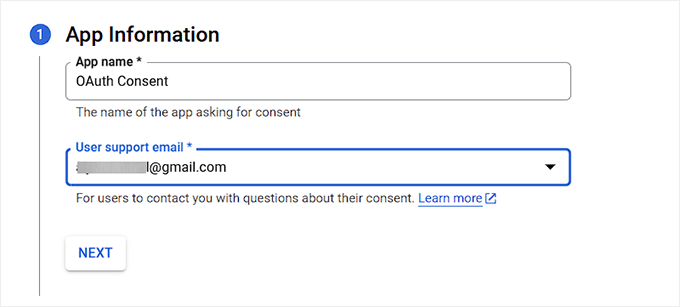
Now, you have to add a name for your app. This name will be shown when asking for consent.
Then, add your business email address in the ‘User support email’ field so users can contact you with questions about their consent. Then, click the ‘Next’ button.

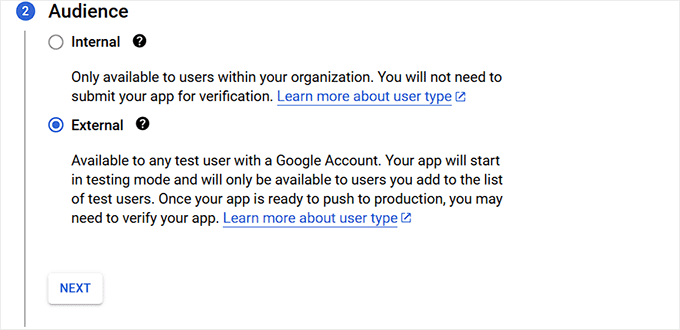
Next, you have to select an audience for your OAuth login in WordPress.
You can choose the ‘Internal’ option if your app is meant for private use within a Google Workspace (formerly G Suite) organization. This means only users within your company’s domain will be able to log in.
On the other hand, the ‘External’ option is best if your app or website is intended for public use. This allows anyone with a Google account to log in.
However, when you first set it up, the app will be in testing mode, meaning that only users you manually add as test users can access it.
Once you’re ready to go live, you may need to submit your app for Google’s verification process to remove restrictions.

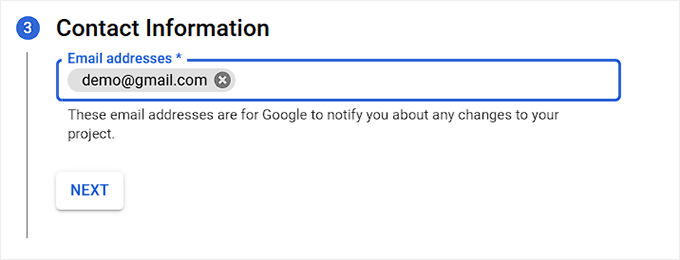
After that, add your email address again.
This will be the email where Google will notify you about any changes to your project. You can also add multiple email addresses.

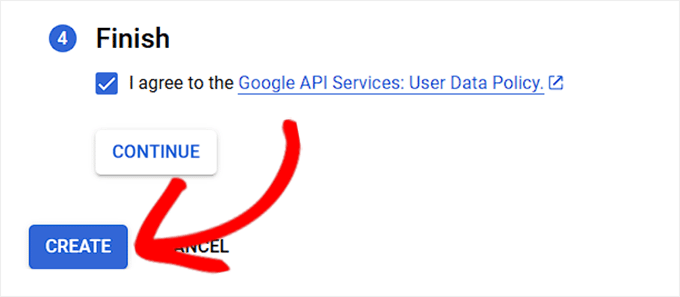
In the end, simply agree to the Google API services policy.
Finally, click the ‘Create’ button.

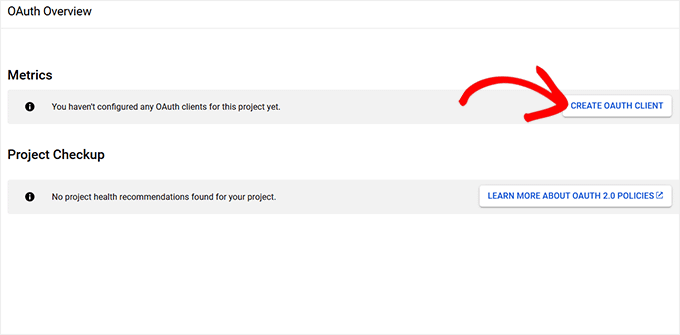
Once the process is complete, you will be taken to the ‘OAuth Overview’ page.
From here, click the ‘Create OAuth Client’ button.

On the next screen, you will need to create an OAuth Client ID.
Choose the ‘Web application’ option under the Application type dropdown menu.
Then, add a name for your client ID.
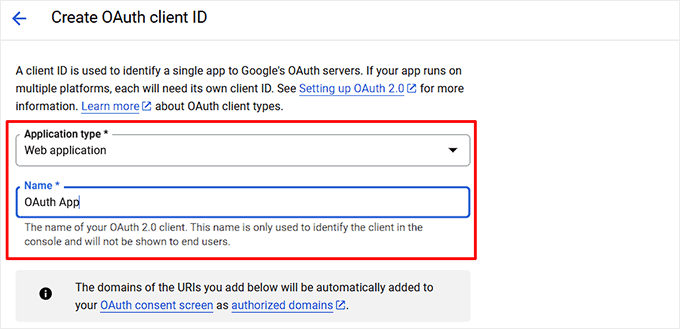

After that, scroll down to the ‘Authorized redirect URIs’ section and click the ‘+ Add URL’ button to enter the redirect URL.
Here, you need to add the link provided by the Nextend Social Login plugin. This URL ensures that users are correctly redirected back to your WordPress website after logging in with Google.
Then, click the ‘Create’ button.
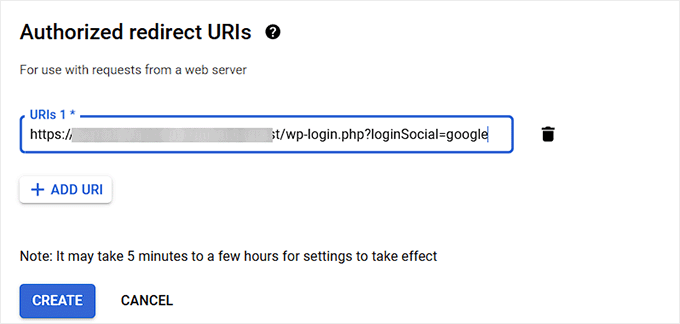

You can find the URL Nextend has created for your website by heading back to your WordPress dashboard.
Here, check the on-screen instructions given by the plugin where the required redirect URL is mentioned.


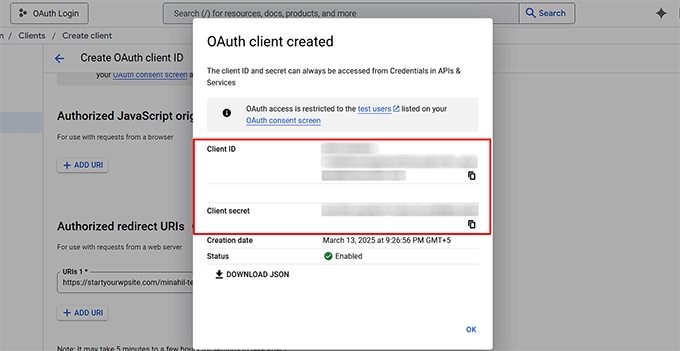
Once the OAuth client ID is created, a popup will appear on your screen listing your credentials.
Simply copy your Client ID and the Client Secret from here and store them somewhere safe.

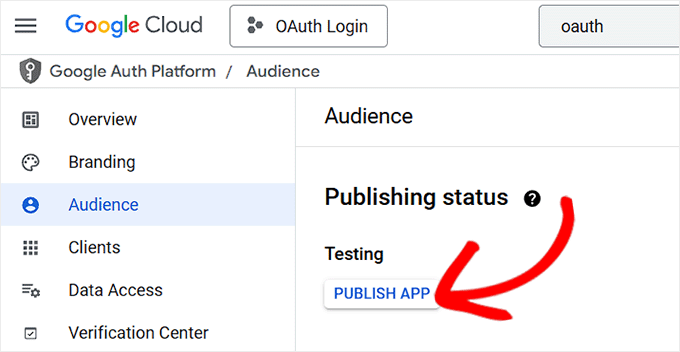
Then, head over to the ‘OAuth Consent Screen’ page from the menu on the left.
Here, switch to the ‘Audience’ tab and click the ‘Publish App’ button to allow this app for any user with a Google Account.
This will open a popup, where you can click the ‘Confirm’ button. Now, Google will verify and publish your app. This process can take 15-20 minutes.

Step 3: Verify Your Google Configuration
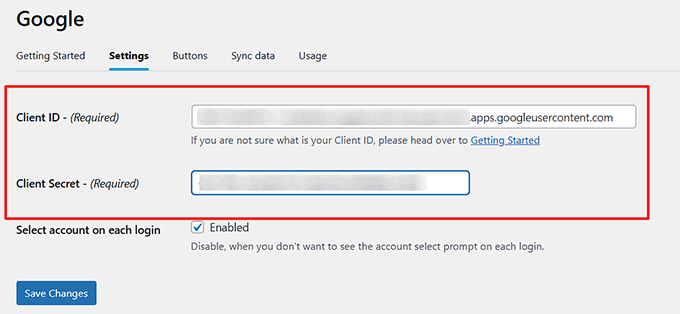
Now, head back to your WordPress dashboard and switch to the ‘Settings’ tab for Google from the top.
After that, add the Client ID and Client Secret that you copied earlier and click the ‘Save Changes’ button.

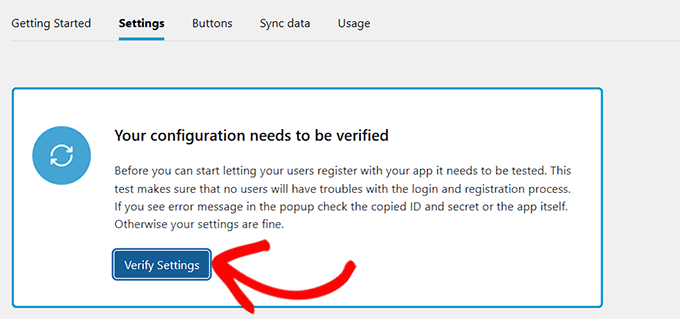
Once you do that, Nextend Social Login will show a popup asking you to verify your configuration. Go ahead and click the ‘Verify Settings’ button.
Keep in mind that if you skip this step, the Google OAuth sign-in option will not appear on your screen.

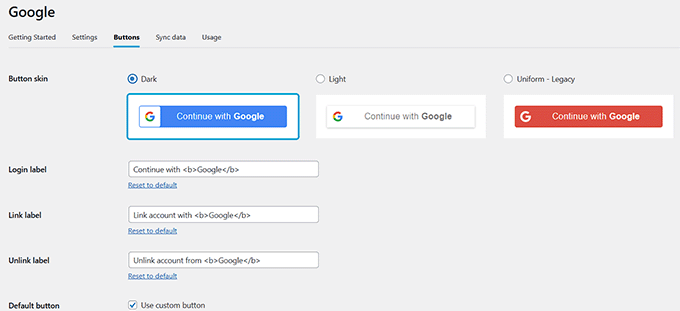
Next, switch to the ‘Buttons’ section from the top.
Here, you can choose a button style for your Google OAuth login. You can also create a custom button with custom code if you like.
Once you are done, just click the ‘Save Changes’ button to store your changes.

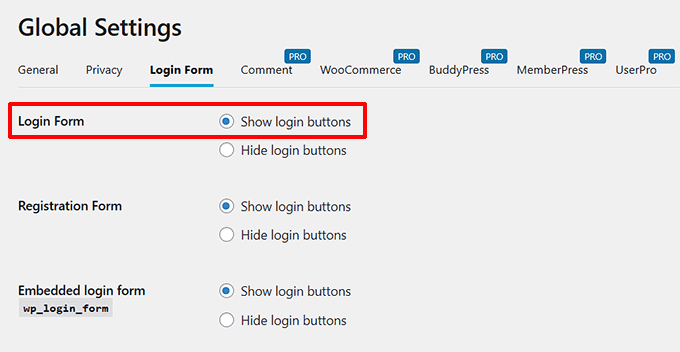
Now, you need to switch to the Global Settings » Login Form tab from the top.
Here, check the ‘Show login buttons’ box for the ‘Login Form’ option so that users can easily opt for the OAuth sign-in option from here.
You can also configure the rest of the settings according to your liking.

Next, click the ‘Save Changes’ button.
Then, you have to head back to the Settings » Nextend Social Login page from the WordPress dashboard.
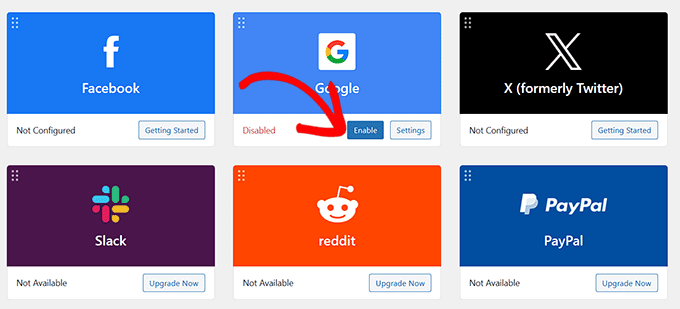

Finally, click the ‘Enable’ button under the ‘Google’ option. You can now repeat this entire process with different third-party apps to add OAuth login for them.
Once you are done, simply visit your WordPress site to see the OAuth login in action.
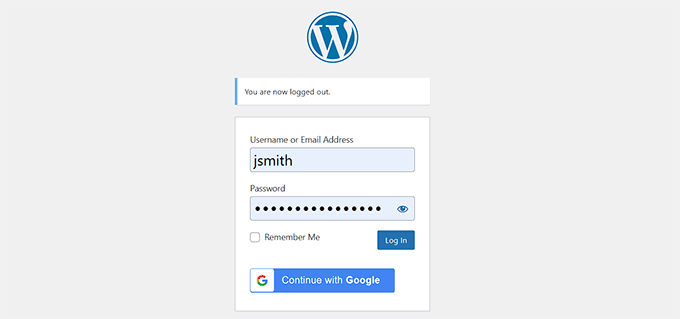

Bonus: Add Passwordless Login in WordPress with Login Links
While OAuth login removes the need to create new passwords, users will still need to rely on credentials from third-party accounts like Google or Facebook.
If you want to go completely password-free, then login links offer another secure login method. It lets users bypass the WordPress login credentials and simply click on a link to log in to their accounts.
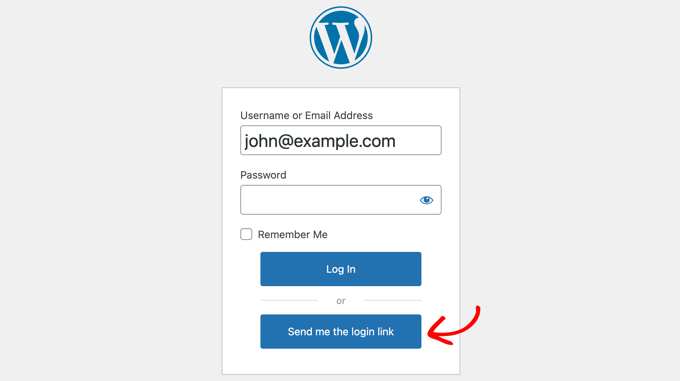

With the Magic Login plugin, users simply need to enter their email address, and a one-time login link is sent to their inbox. Clicking the link grants instant access, with no passwords required.
This reduces login friction while keeping accounts secure. It’s especially useful for websites where you want to minimize barriers to entry and improve the user experience.
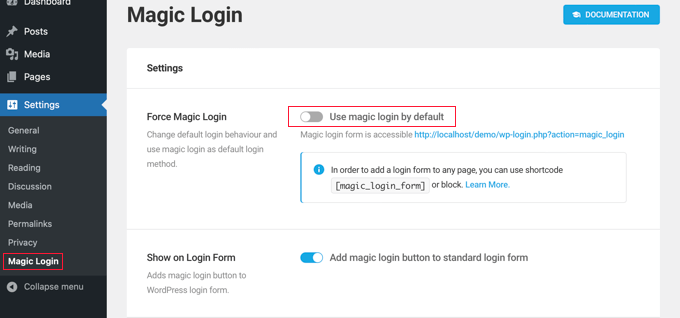

Plus, since these login links are time-sensitive and unique, they provide an extra layer of security against brute-force attacks and credential leaks.
To get started, see our tutorial on how to add passwordless login in WordPress.
I hope this article helped you learn how to add OAuth login in WordPress. You may also want to see our beginner’s guide on how to add one-click Google login in WordPress and our tutorial on adding CAPTCHA in WordPress login and registration form.
If you liked this article, then please subscribe to our YouTube Channel for WordPress video tutorials. You can also find us on Twitter and Facebook.

